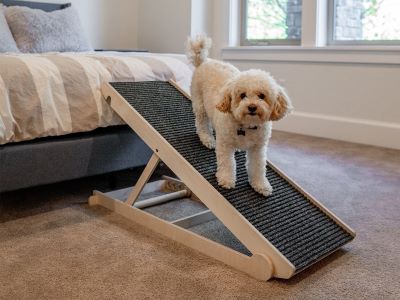
Ever found yourself playing the role of a human staircase, lifting your pup onto the bed, couch, or into the car every time they desire some quality cuddle time or an adventure? 🛏️Or wondering if am I a dog ramp? and how to make a dog ramp.

Well, it’s time to bid farewell to those moments, and say hello to the wonderful world of DIY dog ramps and craftiness!🖍️
So, grab your tools, let your imagination run wild, and let’s embark on this paw-sitively delightful adventure to provide your dog with the freedom to move in style while giving your DIY skills a delightful workout! 🐕🌟
How to Make a Dog Ramp?
Whether your dog needs help getting onto the bed, couch, or into the car, a well-constructed ramp can make their life much easier and more comfortable.
“In fact, dog stairs and ramps can also make life easier for some very small dogs or breeds with short legs and long bodies, like Dachshunds and Corgis”, says the experts at AKC. Let’s see the step-by-step process of building a DIY dog ramp.
Step 1: Materials and Tools
Gather the necessary materials and tools before you start. Here’s what you’ll need:
| Materials | Tools |
|---|---|
| Plywood or MDF board | Saw 🪚 |
| 2×4 lumber (or wood)🪵 | Drill 🔩 |
| Wood screws | Screwdriver |
| Sandpaper | Tape measure 📏 |
| Outdoor carpet or non-slip material | Pencil |
| Wood glue | Clamps (optional) 🗜️ |
| Hinges (for a folding ramp) | Paintbrushes (optional) 🖌️ |
| Paint or stain (for aesthetics)🎨 |
Step 2: Measure and Plan
Measure the height your dog needs to reach and determine the ramp’s purpose.📏📐Calculate the ideal length based on a comfortable incline angle, usually 18-25 degrees.

Sketch a design, considering landing platforms if needed, and ensure it accommodates your dog’s size.🐾 Choose sturdy materials like plywood or MDF, and plan for safety with non-slip surfaces and weatherproofing if necessary.
This planning phase sets the stage for your dog ramp, guaranteeing it meets your dog’s requirements and provides secure access to their desired spots.
Step 3: Cut the Ramp Platform
With your blueprint in hand, it’s time to bring your dog ramp to life. Precise cutting is crucial to ensure a secure and comfortable surface for your pup.🐕
Depending on the size and type of your dog, choose materials like plywood or MDF that can support their weight without flexing. Use the appropriate saw, such as a circular saw or jigsaw, to create smooth edges.🛠️
Step 4: Create the Frame
Cut your 2×4 lumber into pieces for the frame of the ramp. You’ll need two long pieces for the sides and shorter pieces to connect them at the top and bottom.
The exact dimensions will depend on your ramp’s size. Assemble the frame by attaching the pieces together using wood screws and wood glue.
Step 5: Attach the Ramp Platform
Secure the plywood or MDF board to the frame, ensuring it’s centered and level. Use wood screws spaced evenly along the frame to secure the platform in place. Make sure it’s firmly attached and does not wobble.

Step 6: Add Non-Slip Surface
To provide your dog with grip, attach outdoor carpet or non-slip material to the ramp’s surface.
Use glue or screws to secure it in place, making sure it’s taut and free of wrinkles. This step is crucial for your dog’s safety and confidence when using the ramp.
Step 7: Finishing Touches
You can paint or stain the ramp to match your home’s decor or protect it from the elements if it is used outdoors. Applying a finish will also make the surface easier to clean.
Step 8: Hinges (Optional)
If you want a foldable ramp for easy storage or transport, attach hinges at the top of the ramp where it connects to the base frame. This way, you can fold it up when not in use.
Step 9: Test and Adjust
Before your dog🐕 takes its inaugural stroll up the ramp, it’s crucial to perform a thorough test and adjustment phase.
Begin by placing the ramp in its planned location, whether it’s next to the couch, bed, or vehicle. Encourage your dog to use it gently, offering treats and praise to build confidence. Observe their progress closely.📈
Ensure the ramp does not wobble or slip during ascent or descent. If adjustments are needed, tweak the angle, add more grip if necessary, or reinforce weak spots. This step is about fine-tuning to guarantee your dog feels secure and comfortable using the ramp.👏
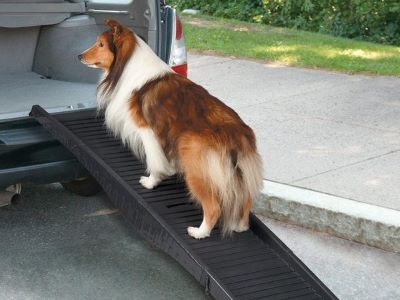
If you plan to use the ramp for car access, be sure to test it with your vehicle to ensure proper fit and stability. See how to make a dog ramp for a car for tips.
Purpose of Dog Ramp
Dog ramps serve a variety of useful purposes, enhancing the lives of both dogs and their owners. To choose the best dog ramp for your needs, consider factors like your dog’s size, mobility, and the surfaces they need to access. Here are some of the purpose of dog ramp:
- Ageing or Mobility: Dog ramps provide a gentle incline that allows senior dogs or those with mobility issues to access elevated surfaces more comfortably. This includes getting on and off beds, couches, and even into vehicles.

- Joint Strain: Dogs, especially larger breeds, can experience joint strain or injury when jumping onto high surfaces. Ramps help reduce the impact on their joints[1], promoting joint health and preventing injuries.
- Post-Surgery or Injury: After surgery or injury, dogs may need assistance with climbing or descending stairs or accessing furniture. Ramps offer a safe and gradual way for them to move around while they heal.
- Small Breeds: Tiny or short-legged dogs may struggle to reach higher surfaces. A ramp makes it easier for them to access these areas without relying on their owners for assistance.
- Puppies: For young puppies, ramps can be a helpful aid in teaching them how to navigate stairs and other obstacles, promoting independence and confidence.
- Car Access: Dog ramps for cars or vehicles are designed to help dogs get in and out of vehicles safely. This is especially beneficial for larger dogs or those with physical limitations.
- Convenience: Dog ramps aren’t just for the benefit of dogs; they make life easier for dog owners. Instead of constantly lifting or assisting their pets, owners can rely on-ramps for convenience.
FAQs
Is a Dog Ramp a Good Idea?
If you have a senior dog, a dog with arthritis, or a dog with other mobility issues, it may be time for dog stairs or a ramp. In fact, dog stairs and ramps can also make life easier for some very small dogs or breeds with short legs and long bodies, like Dachshunds and Corgis.
How Do You Make a Ramp for a Dog to Go to Bed?
Cut a 1×10 board to the length of the distance between the edge of the top crate and the floor. Attach a door hinge using the provided hardware on the centre of one end of the board. Set the remaining hardware off to the side. Next, wrap the board in a small rug for added traction and style.
Do Dogs Prefer Stairs or Ramps?
If you have a young, active, or physically fit dog that does stairs all the time, they can probably manage well on stairs, while dogs who are not as physically able, or dogs for whom you want to stop or slow excessive stair use, would benefit more.
Summary
And there you have it, folks! So, how to make a dog ramp? Well, you’ve got the answers, from measurements to materials, and even a few laughs along the way! 📏🪚
With each step, you’ve not only built a ramp but also built a bridge to comfort and convenience for your dog.🐶
For dogs that love swimming, a water ramp allows them to easily enter and exit pools, ponds or other bodies of water. Learning how to build a dog water ramp is a great project for enabling safe water fu
You’ve tackled DIY like a pro and gifted your pup the freedom to conquer new heights with confidence. Now, Cheers to canine comfort, craftiness, and countless moments of laughter and love! 🐕❤️
Reference:
- Harari, J. (2023, August 22). Other joint disorders in dogs. MSD Veterinary Manual.


