Ever tried giving your dog a haircut only to feel like you are wrestling with a dull instrument? We get it: the struggle is real. That’s where the unsung heroes, the dog clipper blades come into play. But “How to sharpen dog clipper blades?” 🐶
Imagine a well-groomed dog, a smoothly buzzing clipper, and not a hair-out place. The key? Sharp blades!
In this step-by-step guide,📃 we will understand how to sharpen your dog clipper blades. So, without further ado let’s dive into the dog grooming world.
How to Sharpen Dog Clipper Blades? Step-By-Step Guide!
Just like different coat types of your dog, there are some differences in dog clippers too. Let’s see them:
1. Detachable Blades: Easily switchable, offering versatility in cutting lengths.✂️ Ideal for various coat types, from short to long.
2. Skip-Tooth Blades: Perfect for tackling thick or matted fur. Their spaced teeth prevent clogging, ensuring a smoother grooming experience.
3. Fine-Tooth Blades: Designed for intricate detailing and a polished finish. Suitable for breeds with finer or thinner coats
Your dog deserves the best grooming experience, in different grooming one is their coat. Choosing the right grooming instruments for your dog and maintaining them is important. So, let’s see this step-by-step guide on “How to sharpen dog clipper blades?”
Step 1: Tools and Materials
It’s crucial to start this journey with all the essentials, Here’s the list:
🐾 Screwdriver: A screwdriver helps dismantle the blades effortlessly, allowing you to venture into the inner workings of your clipper.
🐾 Cleaning Brush: This brush, with its agile bristles, ensures no strand is left behind, preparing the blades for their sharpening makeover.
🐾 Blade Wash: The wash dives deep, eliminating lingering grime and preparing the canvas for the sharpness makeover.
🐾 Blade Oil: Just as a well-oiled machine runs smoothly, your clipper blades need this liquid magic. It ensures seamless gliding and enhances the overall lifespan of your grooming tool.
🐾 Sharpening Stone or File: The stone or file sharpens and hones, bringing back that precision cutting power.
Step 2: Safety Precautions
your safety precautions are the sturdy armour that ensures a smooth journey. Just as you wouldn’t start a car without turning the ignition off, the same applies to your clippers.
Switching off ensures a controlled environment for the blade-sharpening spectacle. Unplugging eliminates any surprise starts, making your workspace a secure haven for both you and your clipper.
Take a moment to visually confirm that your clipper is indeed in its resting state. Consider this a pause in the grooming rhythm, a moment of quiet before the clipper blades regain their song with newfound sharpness.
Ensuring your clippers are in a state of blissful stillness is your passport to a secure grooming experience.
Step 3: Dismantling the Blades
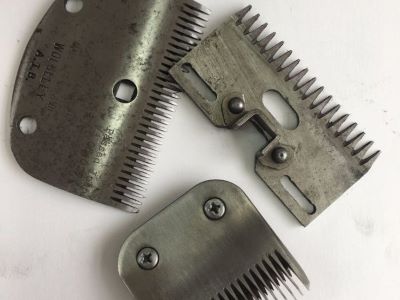
First, dismantle the blades. The screws, like hidden guardians, hold the blades in place. The screwdriver becomes your wand with an elegant twist.
Loosening the screws marks the beginning of the grooming change.
The blades, once held in unison, now long for a solo performance. Gently coax them apart, treating each with caution.
Step 4: Cleaning the Blades
Now is the time to clean the blades. Think of it as sweeping away the leaves before a garden party, a necessary prelude to perfection.
Its bristles dive deep, sweeping away hair and debris with surgical precision. Stroke the brush across the blades, ensuring every nook and cranny is cleared. Be relentless. Ensure not a strand remains.
A clean blade is your guarantee of a smooth, snag-free grooming experience. This step isn’t just practical, it’s a visual cue that your blades are ready for their sharpness input.
With the brush as your trusted companion, you’re not just cleaning blades; you’re prepping them for a grooming masterpiece. So, brush away!
Step 5: Blade Washing
This step is like giving your blades a spa treatment, ensuring they are ready for the grooming runway.
Apply a modest amount of blade wash directly onto the blades. Ensure an even distribution across the blades. Think of it as giving your clipper blades a hydrating facial, every corner deserves attention.👀
Employ a circular motion with the blade cleaning brush to work the wash into every crevice. The goal is cleanliness just like a fresh, crisp sheet.
Leave no trace of the wash behind, ensuring your blades emerge from this spa session rejuvenated and ready to perform.
Step 6: Sharpening Process
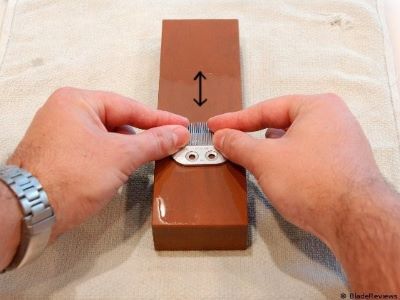
Grip the blade with confidence, ensuring it meets the sharpening surface at the correct angle. Think of it as aligning puzzle pieces, precision is key.
Maintain a firm but controlled grip. This isn’t a power struggle, it’s a delicate ballet between your hands and the blade, with the goal of achieving a razor-sharp outcome.
As the blade meets the sharpening stone or file, stroke it with deliberate movements. Picture it as a rhythmic dance, each stroke contributing to the blade’s sharpening symphony.
Repeat the strokes methodically. This isn’t a race; it’s a journey towards perfection. Each repetition refines the blade, enhancing its sharpness.
Keep sharpening until the blade achieves the desired sharpness.🔪 This step is akin to polishing a gem, patience and repetition are your supporters.
Inspect the blade visually, and run your fingertips gently across its edge. A sharp blade leaves no room for doubt.
Step 7: Oiling the Blades
Imagine it as a comforting hug, preparing your blades for their next grooming encore. Delicately place a single drop of blade oil onto the blades. Precision is your ally here, think of it as placing a drop of morning dew on a leaf.🌿💧
Allow the oil to settle in the nooks and crannies. It’s like a gentle rain, finding its way into every corner.
Now, gently move the blades. As you move the blades, notice the smoothness. The goal is effortless gliding, a sign that the oil has worked its magic, providing an oiled shelter for your blades.
With this oiling act, you’re not just maintaining, you’re nurturing your clipper blades for future grooming triumphs. So, drop that oil!
Step 8: Reassembling the Blades
Here’s you ensure your grooming companion is ready for the next grooming session:
Before tightening those screws, ensure the blades are aligned perfectly. Think of it as assembling a puzzle,🧩 each piece has its place, and precision matters.
Take a moment to inspect. Are the blades sitting snugly, complementing each other like a perfectly matched pair?
As you tighten the screws, channel your inner handyman. Not too loose, not too tight! Ensure a secure grip without overdoing it.
Approach the tightening with steady hands. Tighten each screw deliberately, ensuring a balanced grip.
With sharp, well-oiled blades, you can minimize the risk of clipper burn, but be sure to check out our tips on how to treat clipper burn on a dog if any irritation does occur.
Step 9: Testing the Clippers
With a confident flick of the switch, bring your clippers back to life. It’s akin to turning on a well-tuned instrument before a performance, the suspense is real.
A smooth, steady hum is music to your ears, indicating the clippers are ready to take centre stage in the grooming arena.
Pick a small area for the initial test, a patch of fur eager to be groomed. This step is like a gentle warm-up before the grand performance.
As the blades glide through, assess the cutting action. Smoothness is the key, a sign that your maintenance efforts have paid off, and your clippers are ready for a flawless grooming act.
Maintenance Tips
Here are some maintenance tips to keep your clipper blades in the best condition:
- Regular Cleaning: Cleaning after each use prevents the accumulation of hair and dirt. It’s like tidying up a workspace after a task, a clean slate for the next grooming session.
- Quick Brushing Routine: Invest a moment in brushing off residual hair.🪥 This swift ritual contributes to the longevity of your blades and ensures each grooming session starts with a clean slate.
- Frequency Concern: While regular cleaning and sharpening are DIY essentials, periodic professional maintenance, perhaps once or twice a year,📅 ensures a comprehensive check-up. Consider it an investment in the longevity of your grooming equipment.
- Regular Sharpening: It’s like keeping your tools finely tuned for good performance. If you notice a decline in cutting efficiency, it’s a cue that your blades might benefit from a sharpening session.
- Professional Maintenance: Professional servicing offers a thorough examination and fine-tuning that may go beyond your at-home routine.
FAQs
❓What Is the Best Way to Clean Your Clippers?
All you have to do is soak the edges in the cleaner and wash it with running water. Before putting a cleaning tool on your blade, you have to remember that every cleaning product may require specific treatment. It’s vital to be sure of your cleaning agent’s specifications so that further issues won’t arise.
❓When Should I Replace My Dog Clippers?
In terms of the period to get a dog clipper replacement varies on how frequently you use it. If you have a compressed schedule where you can’t sharpen the dog clippers, you can replace them every four months. On the other hand, if you often use them, it’s better to immediately replace your blades when you deem it’s too distorted to function.
❓How Often Should I Sharpen the Clippers?
To sharpen dog clipper blades will depend on several factors, which include: How hard the steel blade is. How you groom your pet’s fur. The kind of dog you groom.
❓How Do I Select the Best Dog Clippers for Me and My Dog?
To achieve the best dog clippers’ convenience buying, you should evaluate how frequently you’re going to need them. Do you want your tail-wagger to have that sleek-refined look now and then? Or want to have it cut so it won’t grow shaggy?
❓How Much Oil Should I Put After Reassembling the Clippers?
You must often only put around two to three drops of oil to get your clippers into full function. While on the table, place a drop of oil or two at the blade’s centre position on the cutting surface. The drop should be minimal as it’s already enough to spread across the blade.
Conclusion
In conclusion “How to sharpen dog clipper blades?” The takeaway? A sharp blade is a happy blade.
Keeping your clippers clean and sharp ensures efficient grooming, comfort for your dog, and safety for all. 🐶
A sharp blade is a happy blade, especially with breeds like the cockapoo. Investing in the best dog clippers for cockapoo and keeping your clippers clean and sharp ensures efficient grooming, comfort for your dog, and safety for all.
Keeping your clippers in top shape is crucial for efficient and safe grooming. If you need a reminder on the basics of how to groom a dog, be sure to reference our guide.
Regular care increases your clipper’s lifespan and guarantees good performance. Your dog will thank you for this TLC!🫧 Now grab those clippers and start grooming!
